Setting up a Claude Code project environment from scratch takes time. You need to configure MCP servers, write agent prompt files, define skill scripts, set up git hooks, and wire it all together in a way that actually fits your project. Most developers either copy from a previous project and end up with a mismatched setup, or they start from a blank slate and miss things they will only discover later.
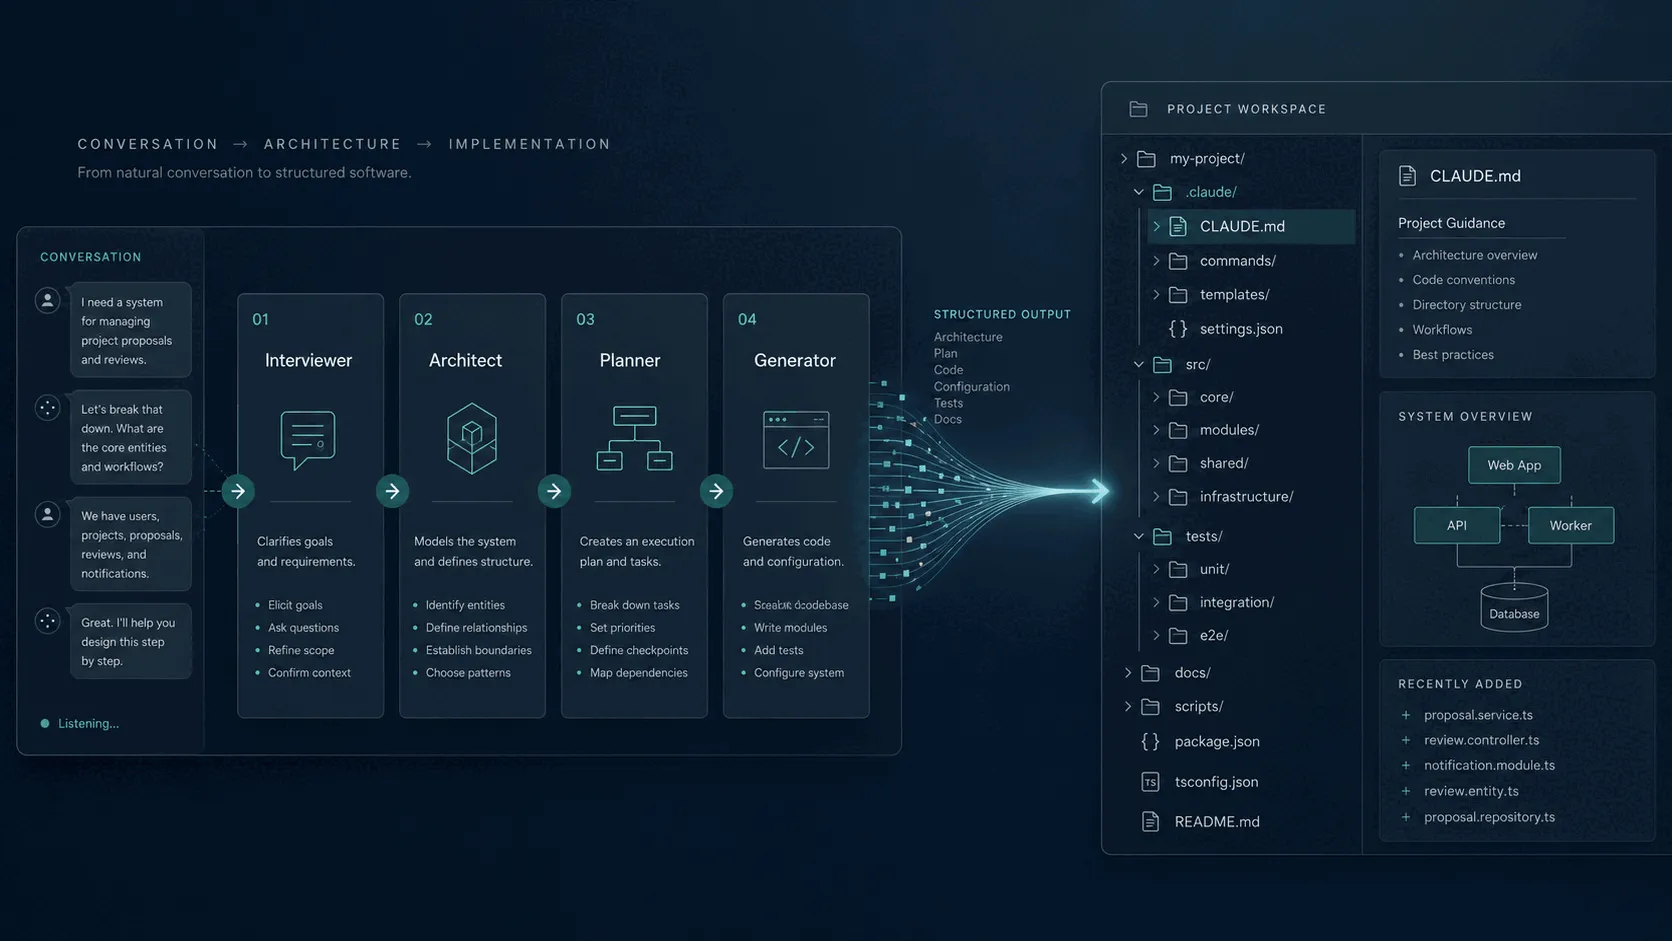
Armature takes a different approach. It interviews you about your project, designs a system architecture through a live conversation with Claude, plans the composition of your environment, and then generates a complete, ready-to-use Claude Code package you can drop into your repository.
This post walks through the complete flow using a concrete example: setting up a Claude Code environment for a FastAPI backend service that powers a task management API.
The Starting Point
When you open Armature, you land on the Interview page. A Usage Dashboard is also available, focused on usage analytics, costs, and compliance tracking. For a new project, you click “Start Interview” and the pipeline begins.
The progress indicator at the top of every page shows where you are across the four stages: Interview, Architect, Planner, Generator. You always know how far along you are and what comes next.
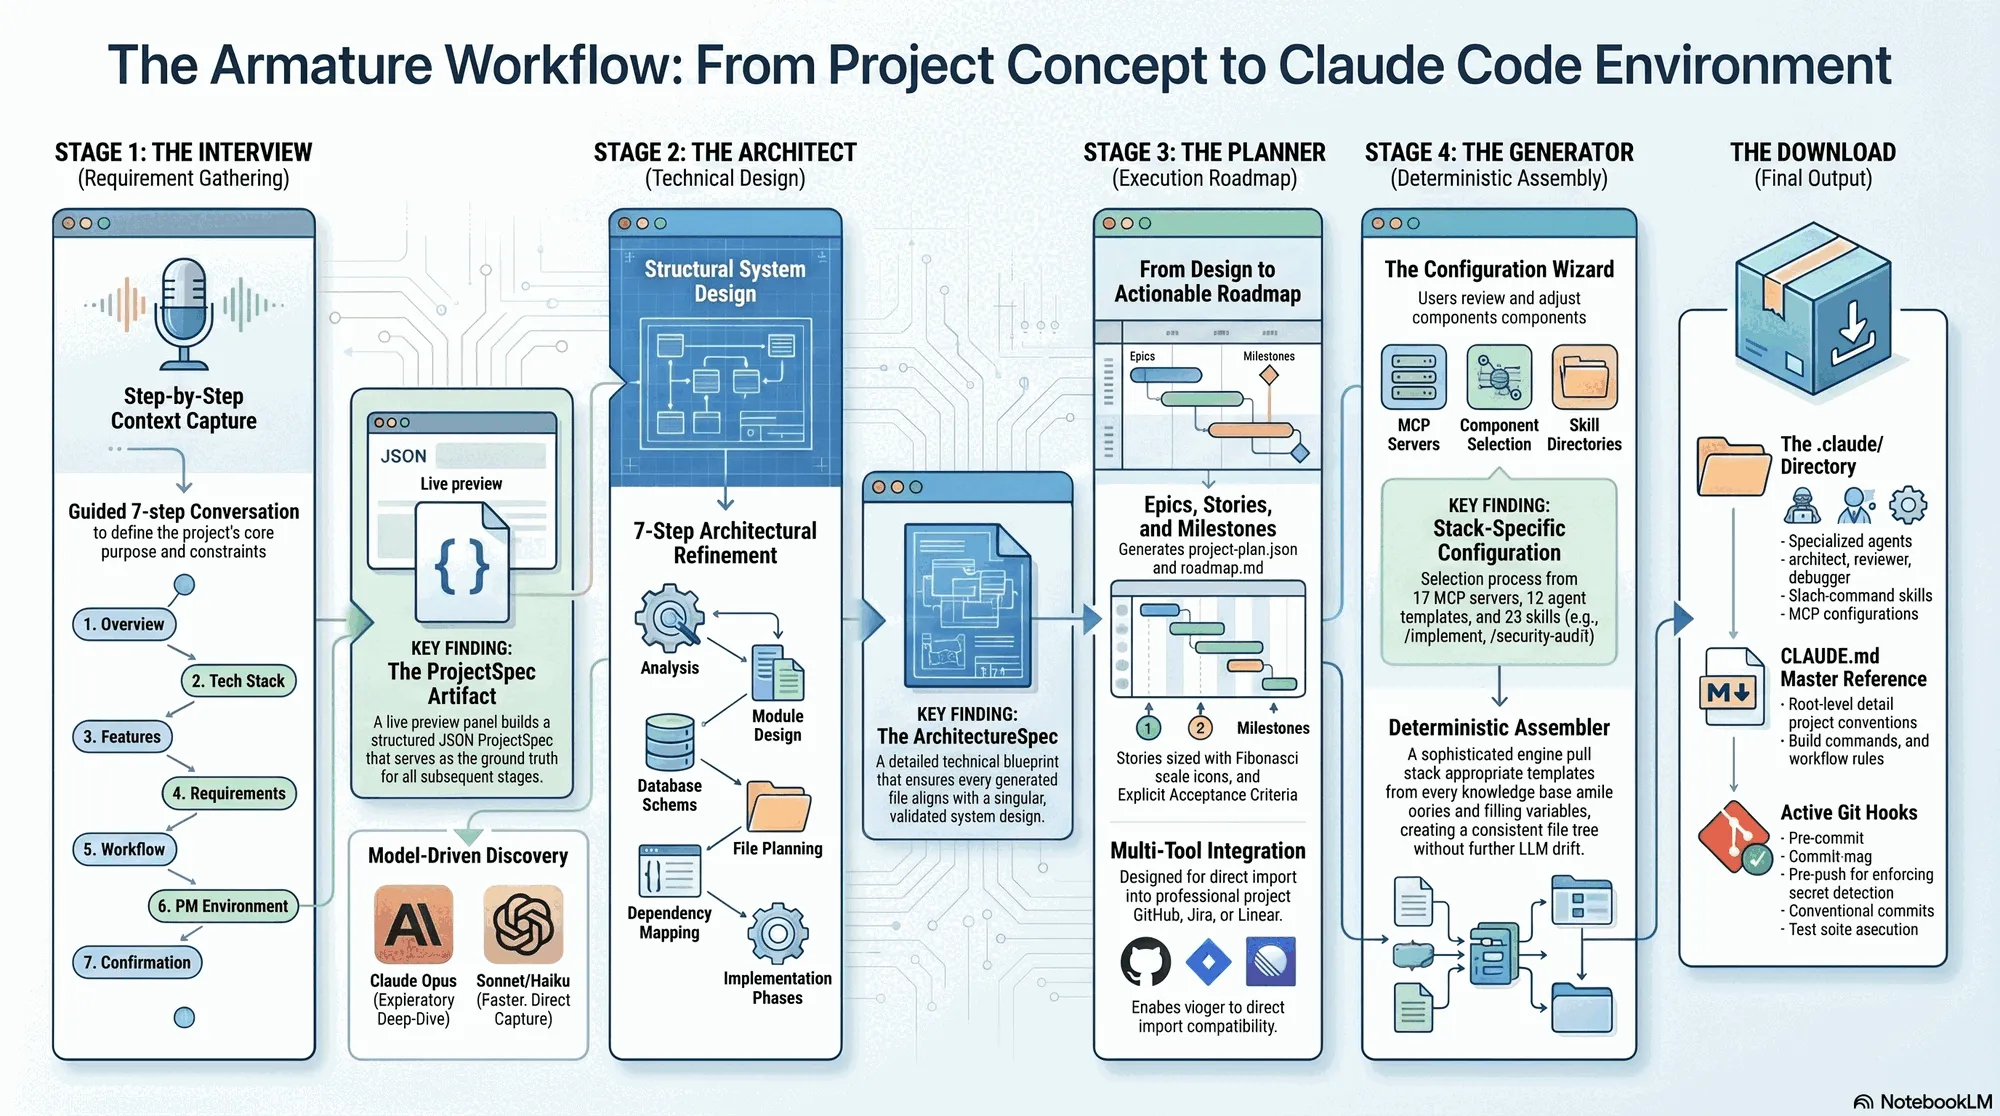
Stage 1: the Interview
The interview has seven steps. Each step asks a focused set of questions, and as you answer, a live spec preview panel on the right side of the screen builds out your ProjectSpec in real time. You can watch the document take shape as you type.
Before starting, you choose a model for the interview session. Opus runs a more thorough, exploratory interview with follow-up questions. Sonnet gives a balanced experience. Haiku moves quickly if you have a clear picture of what you want and just need to get through the steps.
For this walkthrough, Sonnet is the right choice.
Step 1: Project Overview
The first step asks for the project name, a short description, and the primary purpose. For the task management API:
- Name:
task-api - Description: A FastAPI service for managing tasks, projects, and user assignments
- Purpose: Internal tool for a team of 8 engineers
Step 2: Tech Stack
Here you specify languages, frameworks, and infrastructure. The interviewer asks follow-up questions based on what you enter. Entering “FastAPI, Python 3.12, PostgreSQL” triggers a question about your preferred ORM and async database driver. You answer SQLAlchemy 2.0 with asyncpg.
Step 3: Features
You describe the core features: task CRUD, project grouping, user assignment, priority and due date tracking, a simple notification hook when tasks are completed. The live spec panel adds a features section and begins populating bullet points as you type.
Step 4: Requirements
Non-functional requirements: the API must handle 500 concurrent users, response times under 200ms for list endpoints, JWT-based authentication, rate limiting on public endpoints.
Step 5: Workflow
This step is about how your team works. You describe that you use GitHub with a protected main branch, require pull request reviews before merge, and run tests in CI before anything lands. You prefer conventional commits and maintain a changelog.
Step 6: PM Environment
Project management tooling. You mention GitHub Issues and Projects for tracking work, and that the team uses linear sprint cycles.
Step 7: Confirmation
The final step shows the complete ProjectSpec assembled from your answers. The right panel now displays the full document. You can scroll through it and make edits before moving on. If something is wrong, you go back and fix it. When the spec reflects what you actually want, you confirm and move to the next stage.
Stage 2: the Architect
The Architect stage follows a structured seven-step process (steps 0 to 6). Claude Opus reads your ProjectSpec and works through each step in sequence: analysis and directory structure, module design, database design (if applicable), file planning, dependency requirements, implementation phases, and a final validation and confirmation step. Each step auto-advances when the required fields are populated, though you can redirect or push back at any point. The final step waits for your explicit confirmation before handing off.
On the left is the conversation panel. On the right is an architecture preview panel that updates as Claude proposes components and structures.
Claude opens by laying out the overall service structure: a FastAPI application with an async SQLAlchemy layer, alembic for migrations, a Redis cache for session tokens, and a background task queue using FastAPI’s built-in BackgroundTasks for the notification hook. It proposes a directory layout, naming conventions for route files, a dependency injection pattern for the database session, and a testing strategy using pytest-asyncio with a test database.
You can push back or redirect. For the cache layer:
“I’d rather not introduce Redis as a dependency for this service. Can we use a simpler approach?”
Claude adjusts and proposes an in-memory LRU cache for the token blacklist with a TTL, noting the tradeoffs: this works fine for a single-instance deployment but would need to be revisited if the service ever scales horizontally. The architecture preview panel updates.
You continue the conversation for a few more exchanges, settling on the auth pattern and the approach for the notification hook. When the architecture reflects the design you want, you confirm and move to the Planner.
Stage 3: the Planner
The Planner stage sits between Architect and Generator. It takes the ProjectSpec and the architecture and produces a structured project roadmap: epics, stories with acceptance criteria, story points (sized on the Fibonacci scale), and milestones.
The output is a machine-readable project-plan.json (suitable for import into GitHub, Jira, or Linear) and a human-readable docs/roadmap.md. The Planner validates quality gates automatically: every story must have acceptance criteria and story points before the plan is considered complete.
You review the plan before proceeding. If epics are missing or stories need adjustment, the Planner allows targeted fixes before handing off.
Configure + Generate
Between Planner and final generation, there is a Configuration Wizard, a step-by-step UI that lets you review and adjust what gets included in your environment. Each step covers one category: MCP servers, agents, skills, tools, and teams. Recommendations are pre-selected based on your project spec and architecture, but everything is adjustable.
MCP Servers
Armature ships with 17 pre-configured MCP server definitions. For the task API project, the recommended selection includes:
- Memory (persistent context across sessions)
- Filesystem (file read/write operations)
- PostgreSQL (direct database introspection and query execution)
- Context7 (library documentation lookup)
- GitHub (issue and PR management)
Each server shows a brief description of what it does. You can add others from the list, remove any you do not want, or leave the selection as-is.
Agents
12 agent templates are available. The recommended set for a backend service:
architect: system design and architectural decisionsbuilder: full implementation pipeline (plan, implement, validate, document, ship)coding: targeted code changesdebugger: root cause analysisreviewer: code reviewauditor: project audits
Each template comes with a pre-written system prompt tuned to a specific role. You can review the prompt before including it. The security agent template is not in the recommended set for this project, but you add it, because security review matters for a service handling authentication.
Skills
23 skill directories are available. Skills are slash commands that agents and developers can invoke during workflows. The recommended selection:
implement: the builder pipeline (plan, implement, validate, document, ship)git-workflow: branch creation, commit conventions, PR preparationtest-requirements: test requirement specificationsrefactor: systematic refactoring with safety checks
You add the security-audit skill as well, given that you added the security agent.
Tools
The tools step configures language-specific tooling. Because the ProjectSpec specified Python 3.12, the following are pre-selected:
- Ruff (linting and formatting)
- pytest (test runner)
- mypy (static type checking)
Each tool includes its baseline configuration.
Teams
Teams define parallel agent execution templates, groups of agents that run concurrently to tackle different aspects of a task. For this project, the recommended template is the backend review team: architect, security, and reviewer running in parallel to analyze a pull request from three angles simultaneously.
Stage 4: the Generator
Once you confirm the wizard configuration, the Generator runs the DeterministicAssembler, a single-pass engine that takes the project spec, architecture, and your component selections, pulls the appropriate stack templates from the knowledge base, fills in all template variables, and produces a complete file tree. No additional LLM interaction is required for the core assembly; the output is deterministic given the same inputs.
The Download
When you confirm the Generator configuration, Armature assembles your package. What you download is a complete Claude Code project structure:
task-api-claude-env/
├── CLAUDE.md                    # Project guide and command reference
├── .mcp.json                    # MCP server configuration
├── init.sh                      # Bootstrap script
├── CONTRIBUTING.md              # Contributing guidelines
├── .github/
│   ├── PULL_REQUEST_TEMPLATE.md
│   ├── ISSUE_TEMPLATE/
│   └── workflows/
│       └── ci.yml
└── .claude/
    ├── agents/
    │   ├── architect.md
    │   ├── builder.md
    │   ├── coding.md
    │   ├── debugger.md
    │   ├── reviewer.md
    │   ├── auditor.md
    │   └── security.md
    ├── skills/
    │   ├── implement.md
    │   ├── git-workflow.md
    │   ├── test-runner.md
    │   ├── refactor.md
    │   └── security-audit.md
    ├── tools/
    │   ├── ruff.toml
    │   ├── pytest.ini
    │   └── mypy.ini
    ├── hooks/
    │   ├── pre-commit
    │   ├── commit-msg
    │   └── pre-push
    └── docs/
        ├── ARCHITECTURE.md      # Scaffold from Architect stage
        ├── development-patterns.md
        └── testing-standards.md
The CLAUDE.md at the root is the main reference document for the project. It describes the architecture, lists the available commands (/implement, /architect, /refine, and others), documents the workflow, and points to the files in .claude/docs/ for detailed guidance.
The MCP configuration in .mcp.json at the project root is pre-filled with the server definitions you selected, formatted correctly for Claude Code.
The agent files in .claude/agents/ are the system prompt files for each role. The builder agent, for example, contains its full prompt including the five-phase implementation pipeline: plan, implement, validate, document, ship.
The git hooks enforce the workflow you described in the interview: the pre-commit hook runs Ruff, the commit-msg hook validates conventional commit format, the pre-push hook runs the test suite.
To get started, you copy the .claude/ directory and CLAUDE.md into your task-api repository root and run init.sh to install the git hooks. The MCP servers that require local setup (PostgreSQL, Filesystem) include their setup instructions in the CLAUDE.md.
What the environment looks like in practice
Once set up, opening the task-api repository in Claude Code gives you access to the full environment. The agents are available as subagents. The skills are available as slash commands. The MCP servers are active.
A typical workflow looks like this: you open a GitHub issue for adding a due date reminder feature, run /implement #42, and the builder agent takes over. It reads the issue, creates a feature branch, plans the implementation, writes the code and tests, runs the linter and test suite, drafts the documentation updates, and prepares a pull request.
The architecture decisions from the Architect stage are documented in .claude/docs/ARCHITECTURE.md and referenced in CLAUDE.md, so the agents have the context they need to make consistent decisions throughout the project.
Conclusion
The time from starting the Armature interview to having a working Claude Code environment is measured in minutes, not hours. The environment it produces is not a generic template, it reflects the specific architecture you designed, the tools your stack requires, the workflow your team follows, and the agents and skills that make sense for your project.
For teams that want to adopt Claude Code without spending time on environment setup, or for engineers who want to ensure that every project starts with a consistent, well-configured baseline, Armature handles that work automatically.